

We are just about done with the build up. This is the last step, all things considered. The big tip for this step is this: Take your time, and cut ALONG the lines. Test fit, and cut again if necessary. Take off little nibbles of paper at a time. Multiple small cuts are safer than one big cut.
There are two graphics for the pass, the front and back.

Switch to a fresh x-acto blade. Use a straight edge, and line it up along the black lines on the graphics. You should cut directly along the black lines. Not inside. Not outside. Right on them.
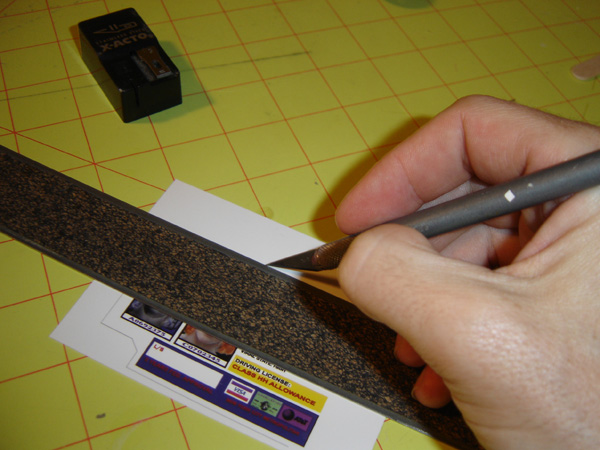
This picture shows my preferred technique. The body of the ruler goes over the graphic, which lets me isolate the black line easily, and the ruler stops the graphic from slipping. If you do this from the other direction, I find that the graphic tends to slip around as I cut. As with all of our previous cuts, you should do three or four light cuts. You don't want to be applying too much pressure to the graphics. This leads to slips and mistakes. Just a little bit of pressure each cut, doing three or four cuts. Whatever it takes.

Here's the front graphic, all cut out.

Test fit! This step is critical! If it's too tight, or too big, just slice off a tiny bit more using the straight edge. Keep going until you get it right.

My method of choice for attaching the graphics is with the two sided tape shown in this photo. It's thinner than the stuff I used earlier in the tutorial, and it has a good grip. Strong enough to keep the graphics in place, but not SO strong that you cannot peel them off if you need to reposition or replace.

Cover the back of the graphic with the tape. You don't need to be too precise.

And fit the graphic into place. I always start by placing the left hand side of the graphic against the stepped styrene part, then just let the rest of it drop into place.

Flip the pass over. Using an x-acto and the lip of the pass body, trim away the excess tape and graphics.

Repeat these steps for the back side graphics.

And that's it! You've now completed building up the kit! Pat yourself on the back, notify your facebook friends, and take a few pictures for your website! Congratulations!!!
Go stand in front of the mirror and yell "moooolteeee passssss" a few times. I assure you, it's very gratifying.

No comments:
Post a Comment